Solving problems on your Angular application can be a real challenge. It all becomes much more difficult when our app doesn’t work and all that it gives us back are some “critical” red lines in the console.
But trust me, in the end, it won’t be so painful. All you have to do is avoid some common mistakes that almost all Angular developers have to face and hit at least once.
Reading this article which will analyze the 7 Most Common Mistakes, your development may have fewer problems :).
I will explain for each point why it is a bad practice or simply an error, and I will direct you in the right direction with at least one possible solution.
1. Import the Required Angular Modules
The most common mistake when you’re a beginner is not to import the required modules. Why? Because you don’t know enough about the framework.
Having a complete overview of Angular takes some time.
The mistake could look like this:
Can't bind to 'ngModel' since it isn't a known property of 'input'This error indicates that the Angular Forms Module was not imported into our module.
While if we get the following error:
Unhandled Promise rejection: No provider for HttpClient!It means that the HttpClient Module was not imported into our root module.
SOLUTION
The solution is simple: we need to import the missing modules in our main module. In most cases, these modules will need to be imported into the AppModule of your app.
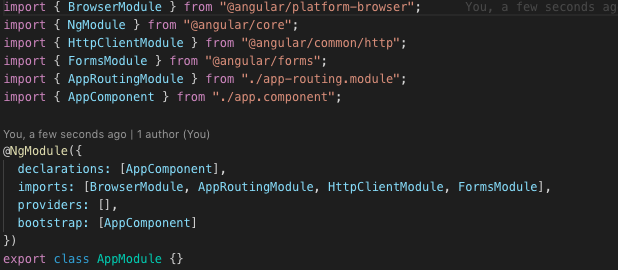
NOTE: In order to avoid that the size of our application grows significantly, we must import ONLY the necessary modules. This best practice is not only applicable to the framework modules but for each custom module that you will want to use.
Let’s take the Angular Material Library as an example: to use the Sidenav module there is a special MatSidenav module and so on.
Therefore, depending on the needs of our module, we may or may not import certain modules:
...MatSidenavModuleMatCheckboxModule...2. Do Not Use DOM References for Items That Do Not yet Exist (@ViewChild)
With the help of the @ViewChild decorator, Angular makes it very easy to refer to specific child elements (nodes or HTML components) of the component.
Simply add # followed by the name. For example:
<div #myFirstDiv></div>We can now refer to that element from our component. If it is a component, we can call its public methods and access its properties. If it is a simple HTML element, we can change its style, its attributes or its children.
Angular automatically assigns the reference to a property of our component if we decorate this property with the @ViewChild decorator.
Let’s make sure we pass the reference name to the decorator. For example @ViewChild(‘myFirstDiv’).

PROBLEM
The @ViewChild directive is very useful, but we must be careful that the referenced element actually exists.
The question arises: why should it not exist?
There are several reasons why an item referenced could not actually exist. The most common reason is that the browser has not yet completed the upload and therefore this element was not added in the DOM.
Obviously, if you try to access this element at this stage, it will be undefined or null.
An example of DOM access when it does not exist is in the component constructor in the ngOnInit lifecycle callback.
Let’s look at an example:
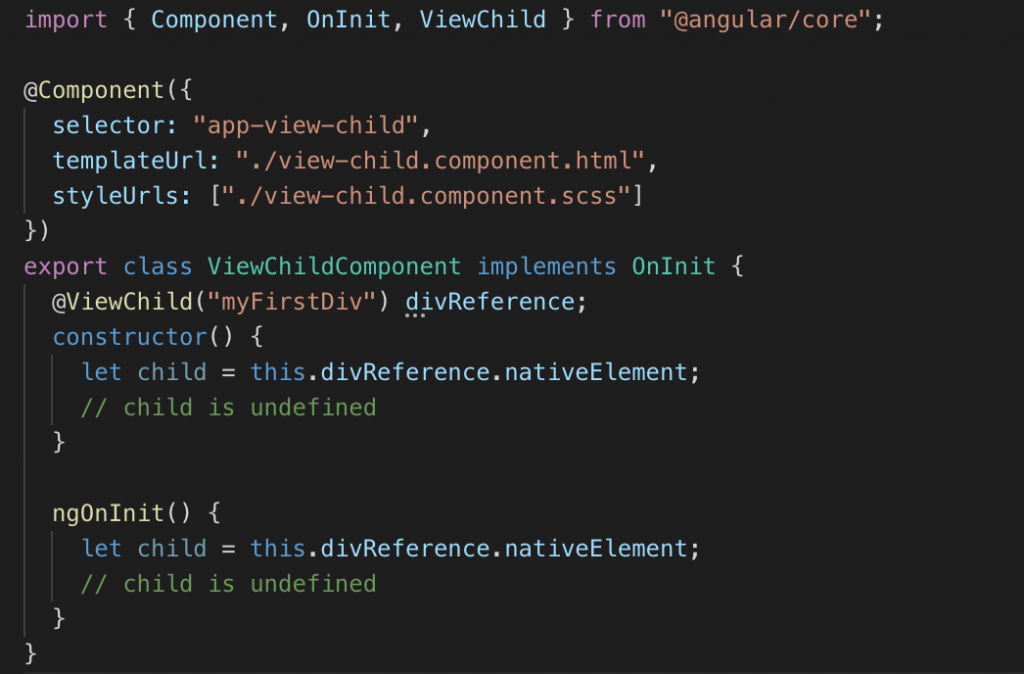
SOLUTION
Remember the DOMContentLoader event or the super classic jQuery callback $(document).ready()?! Here the mechanism used by Angular is the same: ngAfterViewInit.
The callback in question is part of Angular Lifecycle Hooks. ngAfterViewInit is a callback that is invoked when all component and child views are initialized.
Returning to the previous example, we could change the code in this way:

Great! We have solved our problem. But beware there are still other pitfalls to consider.

As we have said before, we can access an element in the DOM when it is actually added.
If we had a scenario like this:

Elements with a *ngIf directive would be completely removed from the DOM.
So we can’t access it in that case.
To prevent our application from crashing, we actually need to check our reference whether it is null or not. In practice our code becomes:

3. Don’t Manipulate the DOM Directly
NOTE: Manipulating the DOM directly in Angular is not considered a bad practice.
Probably our app will work properly on browsers but in different environments like Angular Universal, this may not happen. In summary Angular Universal allows you to render our Angular app on the server-side.
Let’s look at an example:

SOLUTION
Angular provides an ad hoc API for manipulating the DOM: Renderer2. With the help of this API, we can do everything we are used to when working with the DOM.
Here is a clarifying example:

As said we can really do anything, and therefore, I suggest you take a look at the official documentation.
4. Angular Guards Are Not a (Real) Security Feature
Angular Guard is a great way to artificially limit access to certain routes.
The classic example would be to inhibit access to certain pages without logging in.
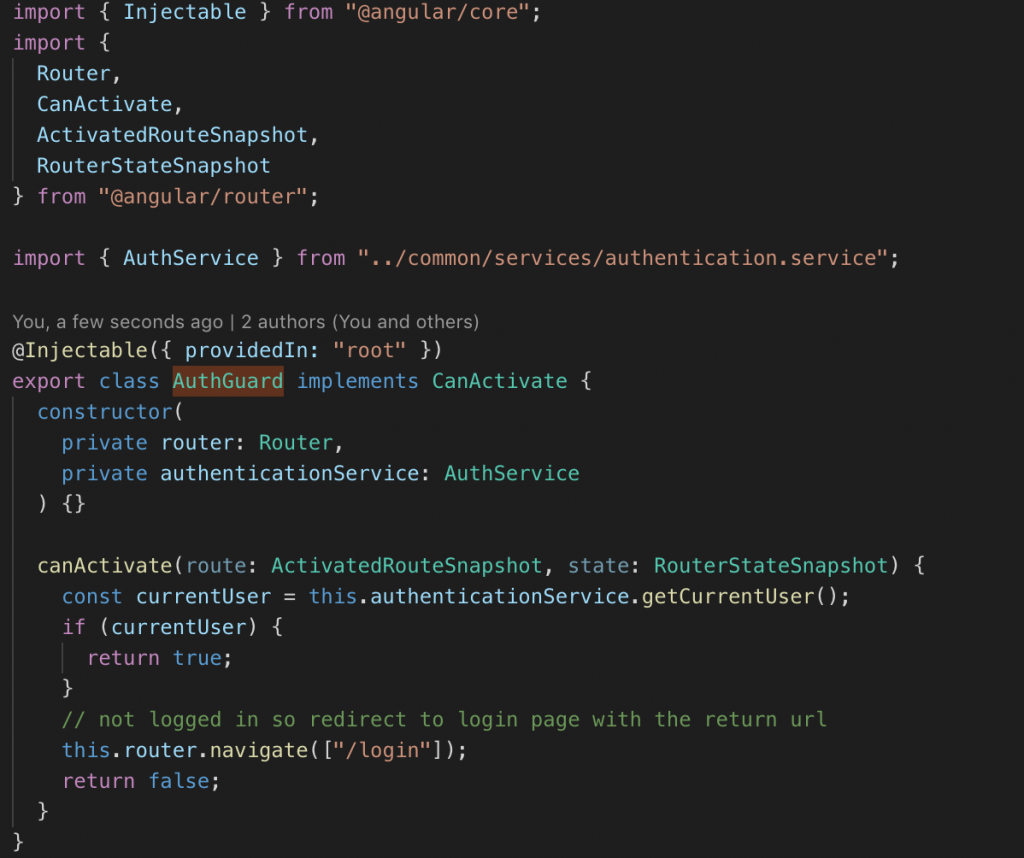
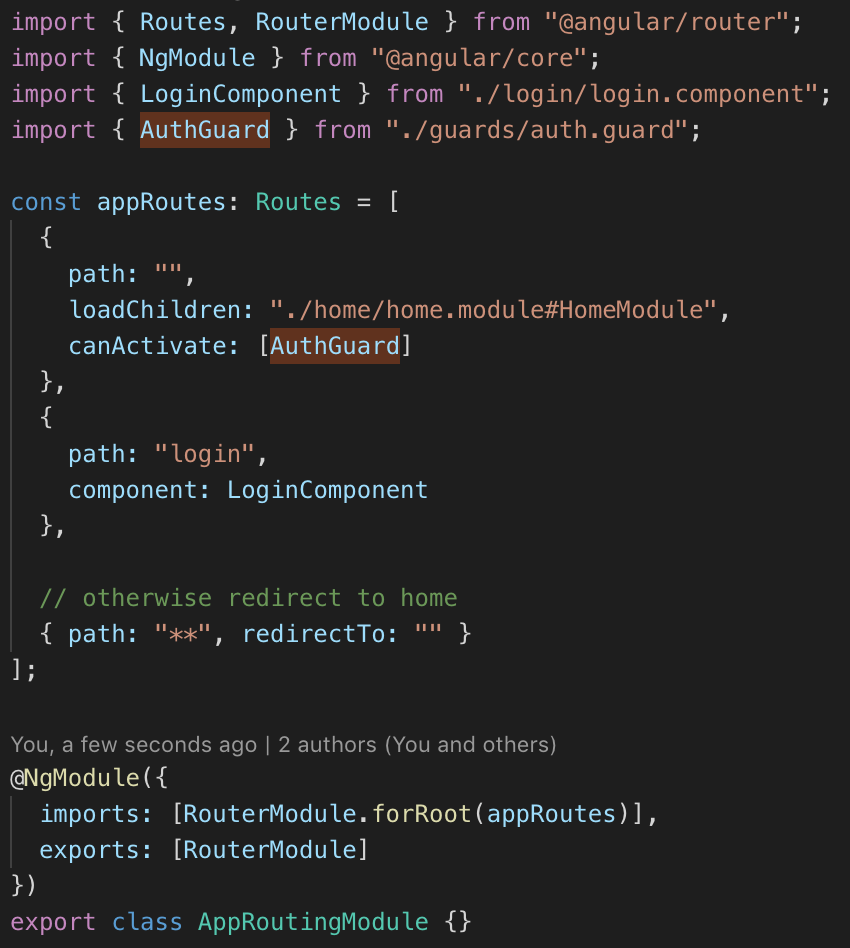
PROBLEM
This remains a more than valid solution to “inhibit” access to certain routes but, like any other “web” solution, it is not 100% secure.
Since we provide the complete source code to potential “dangerous” users, the application can be modified in any way. This means that our guard can be easily circumvented by commenting on a few lines.
SOLUTION
Adding a server-side solution reduces the risk of intrusion to our data within the app. An example would be the use of JWT (JavaScript Web Token).
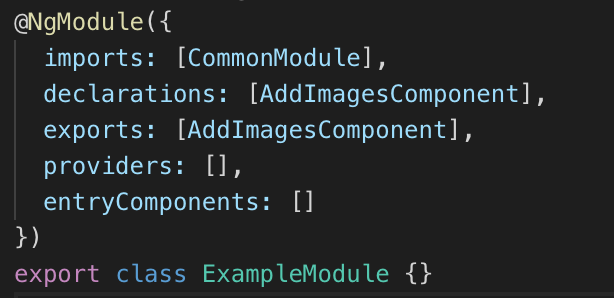
5. Declare Components Only Once
When we start to group our application into modules, which is basically a best practice, among other things, you’ll probably encounter a very common problem:
A component can only be declared in one module!
But what can we do if we want to use our component in multiple modules?
SOLUTION
The solution is simple: just add your component in a module.
Probably a module by component is a bit excessive, so why not create a components module? That module can be imported into other modules and you can use your components there.
6. Optimize and Speed up Your App Using Ngif Instead of the [Hidden] Attribute
There is often confusion between the use of the hidden directive and the *ngIf directive.
The main difference is that the *ngIf directive, instead of hiding only the marked elements (the one that actually makes the hidden directive), removes them from the DOM. Apart from the possible improvements in terms of performance, the *ngif solution seems much cleaner.
So I recommend it as a standard in these scenarios.
7. Use the Service to Avoid Maintainability Problems
NOTE: As general advice, it is always good practice to extrapolate business logic into services.
In this way, it is easier to manage, as a possible modification can be implemented in a few seconds and will be well localized and we should not go crazy in modifying n-thousand lines of code.
This advice is certainly true when using HttpClient. It should always be enclosed within a centralized service. In this way, it is easily testable and it will be easy to make changes.
For example, your backend requires a new header to pass to each request after the update. Without a centralized service, you should change multiple lines of code within your app.
I hope this article was useful. If so, share it with your friends, colleagues or whoever you think might be interested.
Share the post "Why Your Angular App Is Not Working: 7 Common Mistakes"

Valerio Pisapia, 34 anni, laureato in Ingegneria Informatica all’Università di Napoli Federico II. Ha esperienza decennale nello sviluppo mobile e web in ambito internazionale. Fornisce training e mentoring per progetti di svariata natura. Founder della Dreaming Lab, startup IT in Svizzera, che si occupa di consulenza specializzata in ambito Web.

Comments